
All hands to the tanks
The call goes out. The volunteers pour into the military camp at Waiouru in the centre of the North Island. The only war, though, is going to be on rust, handbrake cables,
driveshafts, seized brake systems, the battered cylinders of tank engines and the ongoing tussle to turn out new truck engine parts.
Here is a group of willing sheddies who meet about once every six weeks under the keen oversight of George Pycraft. Their job: to continue repairing the heritage vehicles of the Army Museum at Waiouru.
Their “shed” is a group of four storage sheds housing 85 vehicles in various states of repair. They are as diverse as tanks, the 24-tonne M41 Walker Bulldog, the Centurion, and Valentine tanks (the latter still in World War II Pacific theatre camouflage), a 1941 Canadian Pattern Chevrolet gun tractor, an MB Jeep still wearing its 1942 Long Range Desert Group livery, an M113A1 Armoured Personnel Carrier (APC) painted in UN colours and of the type used in Bosnia, a 1943 Ford F30 truck, a 39-inch searchlight and an M816 recovery wrecker truck made by American Motor Corporation in 1969.
Pycraft, the museum’s Assistant Curator – Technology, says with the help and dedication of the museum’s volunteers they are slowly coming closer to having a complete running collection of heritage vehicles.
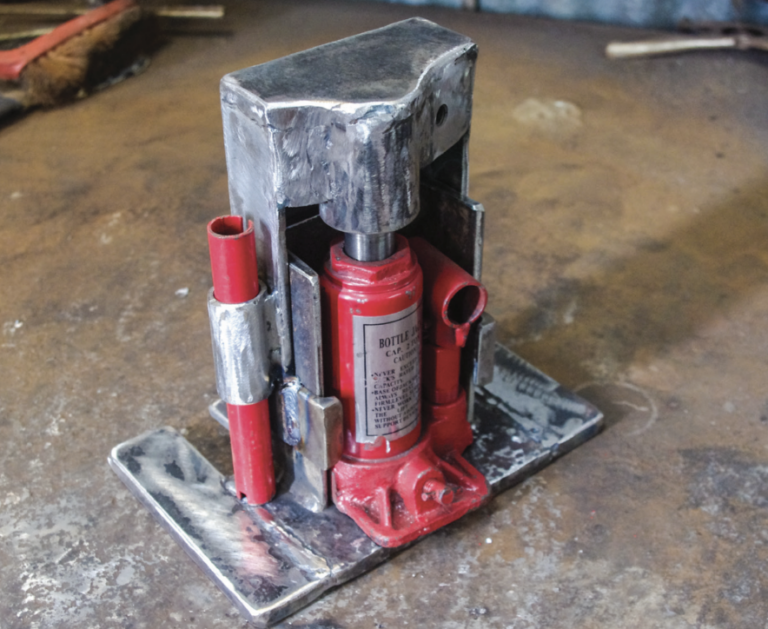
A weighty subject
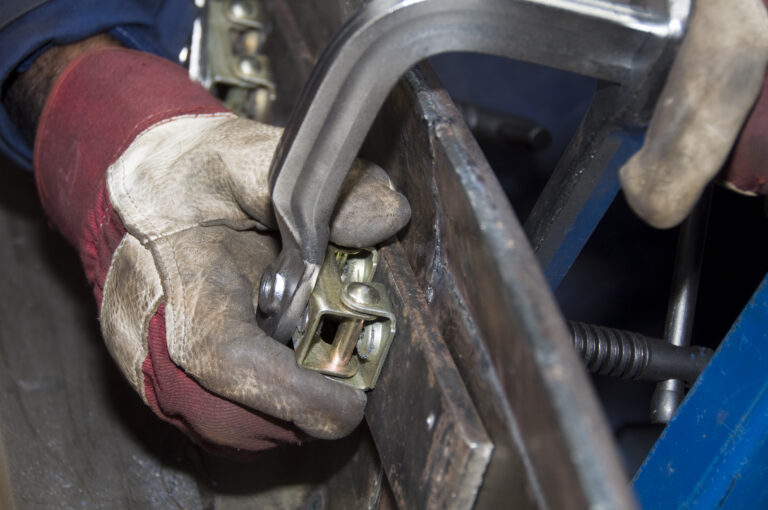
One problem with working alone in the shed and having a liking for large pieces of Victorian cast iron is the difficulty of safely moving or lifting them.
They can be moved with load skates and pipes as rollers, but how do you lift the weight onto the rollers? Trying to push down on a crowbar while arranging pipe rollers under a machine is inviting trouble. A toe jack allows you to lift and hold the weight in the air as you arrange the rollers and put in safety blocks. It is not intended for great weights or high lifts due to stability, but it allows you to lift the weight.

From armour to fighter
An unassuming garage in the Hunua Ranges south of Auckland is the current shed of Gordon Turner and home to his latest project – a full-sized replica cockpit of a Messerschmitt Bf 109E fighter plane. Made from plywood, timber and aluminium and five years in the making so far, it will never take to the skies. But it is eventually intended to become a flight simulator, giving the ‘pilot’ a realistic experience of flying one of World War Two’s most famous aircraft.
Revving up Island-style
As you can imagine, on Great Barrier Island, the population is likely to have more than its share of characters, given the island’s remote location. Part of the charm is its lack of power supply and absence of a supermarket. If something breaks, there’s not likely to be a spare part sitting on a shelf anywhere on the Island, so if you don’t want to wait or to pay hefty freight charges on top of the cost of the part, you make one or use real no. 8 wire ingenuity. Even though it is New Zealand’s fourth largest island (after the North, South and Stewart Islands) and is only a half-hour flight from Auckland, it’s like a different world, and that’s why the locals love it.
The Shed magazine June/July 2026 issue 127 on sale now
Murray Belfield is a phenomenon
He has built a few planes over the years, but none gave Murray the performance and thrills he really wanted until he built his scaled-down German paratrooper’s plane, a Storch. Building this rarest of planes consumed nine years of this 86-year-old’s life. And the result? He couldn’t be happier.
For most of us, stalking a deer across the back country, shooting it cleanly and lugging it home to furnish the table would be accomplishment enough for any evening’s bragging rights.
But when that involves landing an aeroplane you built in your shed onto a handkerchief-sized patch of hilltop scrub, finding and shooting the quarry, manoeuvring the carcase into the spare seat and getting off the ground again, and doing all that at the age of 86, bragging just vanishes in the slipstream. Murray Belfield is, anyway, far too practical and busy a guy to waste his evenings boasting to his mates, but he is, nevertheless, a phenomenon. His plane, the second he has built by hand, is another. Highly specialised for short take-offs and landings (STOL), it is a three-quarters-scale replica of a WWII flying legend, the Fieseler Storch.
The replica, designed by famed aircraft engineer Ladislao Pazmany, is so challenging to build that, to Murray’s knowledge, only one other Pazmany model has been completed to the flying stage, by an enthusiast in Alaska. As if that wasn’t a hard enough ask, Murray has incorporated many improvements of his own based on his many years of bush flying experience (and his dislike of fibreglass).
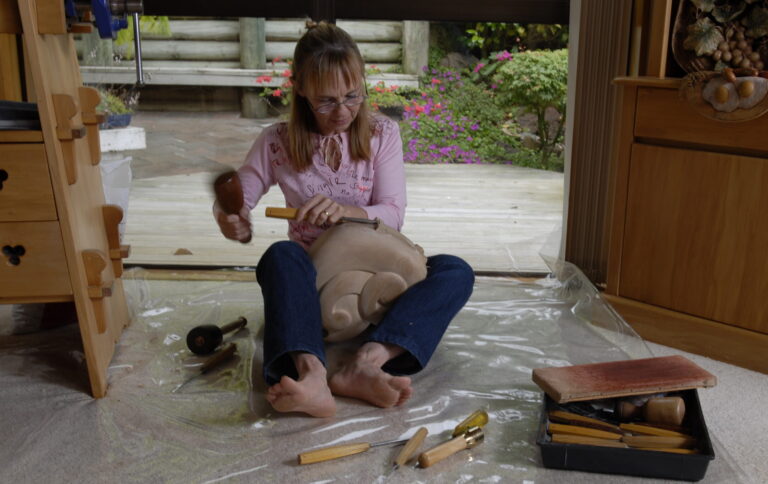
In the dining room shed
Jane Allnatt’s father was a commercial artist, a painter, model-maker and did a bit of carving, so there’s something of the family tradition in what Jane Allnatt is doing in working with wood. But it’s unlikely her father imagined her designs and creations coming out of a shed in the dining room.
Working on a sheet on the floor of a room in her house is the Howick resident’s “workshop” and preferred way of creating work. Yet that work has regularly taken prizes in various categories at the annual National Woodskills Festival at Kawerau, a central gathering place of woodturners and sheddies.
It is also unlikely you would find many men praising the convenience of their working space because, as the sculptor puts it, “the room is centrally placed and I can disappear to cook dinner or if there is any washing, I can do that. The light is good, too.”
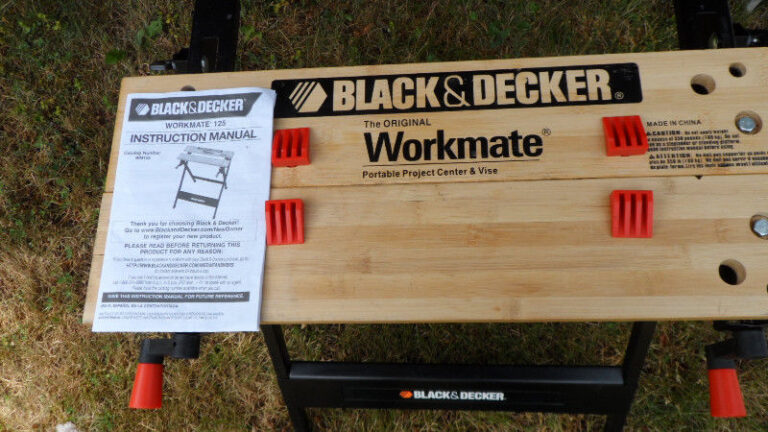
The Workmate – a shed in a cupboard
In 1961, Ron Hickman, a just-married South African immigrant to the UK, was making a wardrobe using expensive Scandinavian chairs as sawhorses (as you do) when he inadvertently cut one of the chairs as well as the plywood. This was his eureka moment. The need for a workbench which could be stored away in an apartment cupboard when not being used was obvious.
His prototype folding workbench had a classic cast-iron and steel Record brand wood vice attached to it.
Ron was known in the Lotus Cars factory, where he was director of engineering, as someone who could always see an alternative approach to design problems, and so it was with his workbench. His final design used the top of the bench as a vise; one half of the top being fixed, the other being moved by two threaded rods to clamp the object being worked on, vaguely similar to a book-binder’s vise. His background in car manufacture led to him design the folding workbench with a metal frame. Because it was intended to be used for woodwork the top was wooden – solid wood in the original design.
Readers’ forum – sheddie chatter
One of the popular features we used to publish in The Shed magazine is the readers’ forum.
Here is one from way back in 2011, what a few sheddies were up to in their shed that year and what was on their minds at that time
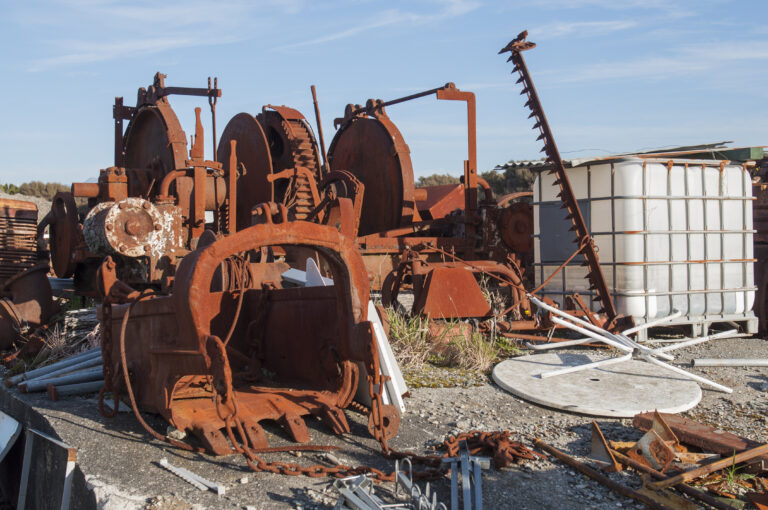
Westland Industrial Heritage Park: From trash to treasure
The West Coast has a history as rich as it is rugged, with a past steeped in mining, logging, and dairy farming on a forest-clad strip between the mountains and the sea. Up by Hokitika airport is a sheddies’ paradise where relics from this past are being resurrected by an enthusiastic and capable band of volunteers.
“It all started back in 1981. Everything was going by train out to scrap, so we formed a club to stop it,” says Mort Cruickshank. The “we” were four young men – Spike Jones, Jim Straton, Mike Rooney and Mort. They formed the Westland Farm and Vintage Machinery Club and started salvaging old machinery that had been destined for the dump. With no premises, they kept it in their backyard sheds and met sporadically to plan the future.
Four decades on, and the Westland Industrial Heritage Park, spread over several acres up by Hokitika airport, is packed with machinery, sheds and enthusiasts. It is a hub of community activities, has a Menzshed on site and is increasingly a drawcard for tourists.
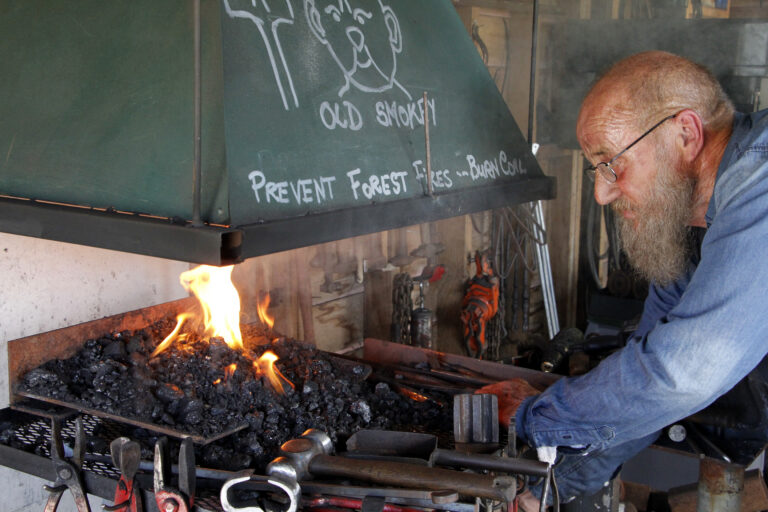
Making a gate – the blacksmith way
Joe Parkes is a blacksmith and as a youngster learned his trade the hard way. In 1958, aged 12, he was apprenticed to his grandfather and he quickly learned not to make mistakes. His giant Scots grandfather, Jack James, was a smithy of the old school. If young Joe got something wrong he had his head dunked in the half barrel of water used for cooling steel from the forge. He learned quickly.
“My grandfather, I called him Pop, was a big bugger, standing 6 ft 11 inches (1.8 metres) tall and weighing in at 20 stone (127 kg). He was a hard bastard, but he was my mentor. I once saw him pull a man through a high hedge and throw him over the top. You didn’t mess with him. If the blacksmiths got into a scrap you kept well clear.
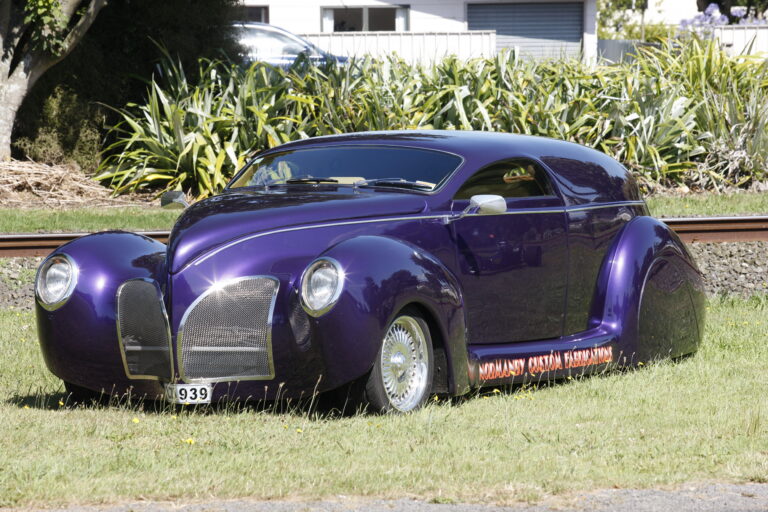
Hot stuff in Taranaki
Hot rods – we see them rumbling round the highways and byways, big V8s burbling, immaculate finished body and paintwork and obviously someone’s pride and joy. Many people don’t realise the work that goes into customising one of these gleaming machines. Some are old cars reshaped and rebuilt, and some are made from scratch, often using the classic designs and lines of cars built in the 1920s, 30s and 40s.
In the little town of Normanby in South Taranaki there’s a workshop set up to create these beasts. We caught up with guys from three businesses in a row having smoko together. An upholstery business, a custom fabrication shop and an engineering shop. All mates who work in together in a way that can only happen in a small town.
Heart of glass
Parts of Carmen Simmonds’ cast glass studio glow with the ethereal, often surreal treasures that emerge from their creator’s imagination and the searing heat of her kiln. Radiantly coloured dolls’ heads, glass lace and crochet, headless dancing dresses, ballet shoes, lilies in milk bottles, flowers, and other organic forms are at once beautiful and disturbing.
Then there is the other side – the chemistry and chemicals, machinery, and tools; hours of modelling, firing, grinding, sanding, and cutting.
But this studio is also a home. Carmen and her husband Glen live at her work studio – a 100-metre-square shed on their 8.5-hectare lifestyle block in Brunswick, Whanganui. The shed was originally intended as Carmen’s full-time studio but when they sold their house in town they had nowhere else to live so they moved into the shed “to camp for a while” and have stayed, still temporarily, for eight years.
Making a workshop bench video
Every shed needs a utility bench, and most sheds usually have one or two.
It’s a place where things can be worked on or stored. I have built a few recently, and I have developed a simple process that makes the process quite easy and results in a sturdy workshop asset with space for storage.
The advantage of this design is that it doesn’t require good, straight timber. In fact, I often buy very cheap, knotty 2nd or third grade timber from my local sawmill, who specialise in Macrocarpa. I can get long lengths, but they are rarely straight or twist-free. Sometimes I can get relatively straight pieces, or I can find 3 metres or so in a 4-5m length. For the most part, you can usually find enough pieces of around a metre that are relatively straight.
The Shed magazine April/May 2026 issue 126 on sale now
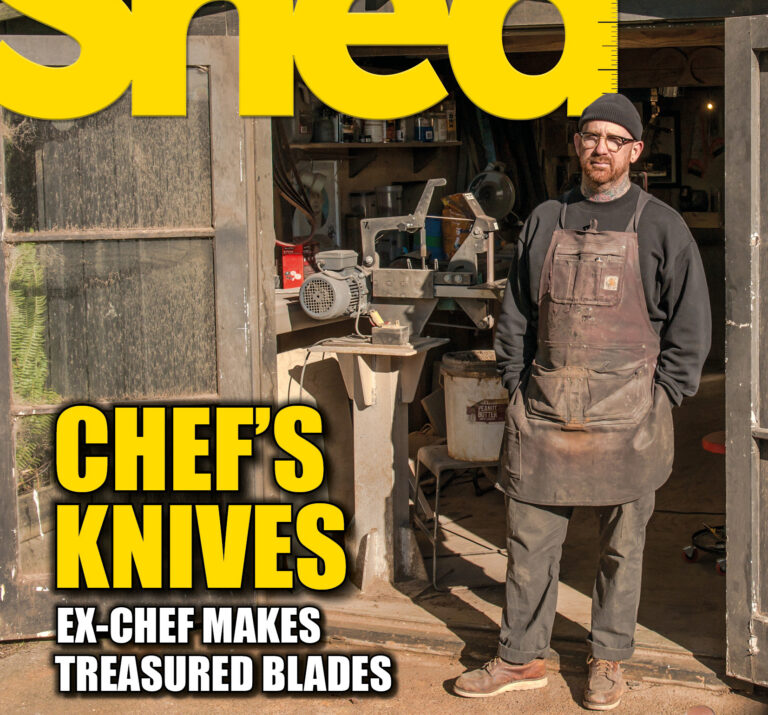
Hayden Scott’s road to crafting Damascus blades has been a journey of self-discovery, from an ambitious teen working the boning tables of the Balclutha freezing works to chef Al Brown’s right-hand man. Now, with over 25 years of experience using knives, he has found his calling: hand-forging the finest blades for cooks all over the world from his backyard sheds in the Waitākere Ranges.
“Hayden grew up in Balclutha surrounded by farmland and a practical family: his mum made the family’s clothes; dad was a chippie; an uncle built airplanes, and another uncle was a fitter and turner.
Hayden and his brother were often left to their own devices, usually with a pocket knife in hand. He remembers, “I always had a project on the go. What have we got here? What can I make from this?” Huts and bows and arrows lead to hovercrafts with electric motors, and later to bicycles, motorbikes, and furniture restorations.
His uncle Russell was a real inspiration, a builder who knocked together a Jodel airplane, which Hayden fondly remembers flying around Otago in. “I was in absolute awe that someone could build something like that, at home.” Another uncle, Allan, was a Fitter and Turner who rebuilt motorcycles. He had to dig out a cellar under his house to store his vast collection of vintage motorcycles. Hayden remembers, “He was always in there with his overalls on, working on them. Growing up around people like that was really motivating.”
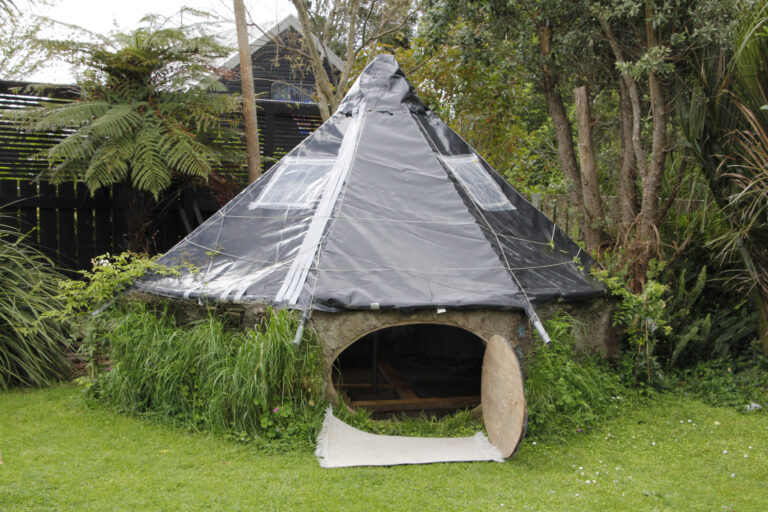
Hobbit haven
I have made a hobbit house for my kids almost entirely from recycled materials and left-overs from building a garage. The frame is an old trampoline. It is 3.2 metres wide (this depends on the size of your trampoline ) and 2.3 metres high at the apex. I can stand in it easily. The poles that were for the side of the trampoline had holes at the top so by the time I lashed them all together it was incredibly strong.
I made the walls out of an old pallet with a couple of bigger bits of driftwood on top. We mudded the walls with a mix of dirt, grass and a little cement until there were no more holes and then patched as needed. I used all kinds of recycled wood that would fit. We have added more layers as needed or as bits fall off. The walls are probably about 100 mm thick on average but up to 150 mm in places and we have added paper in the middle for extra insulation.
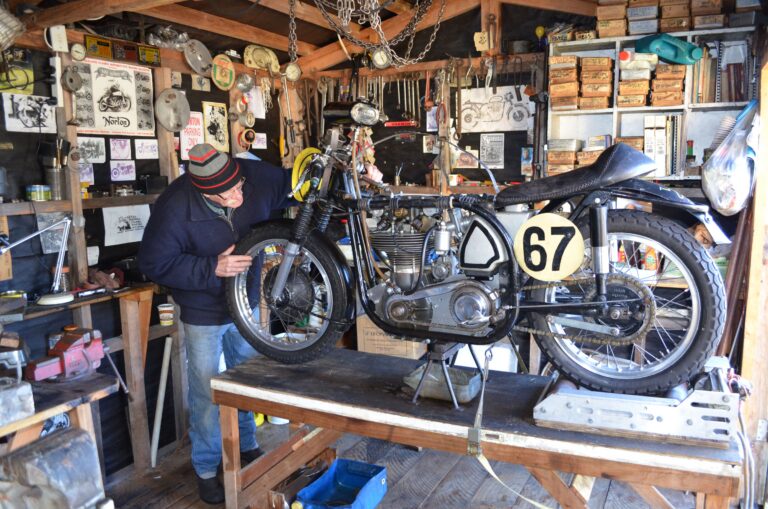
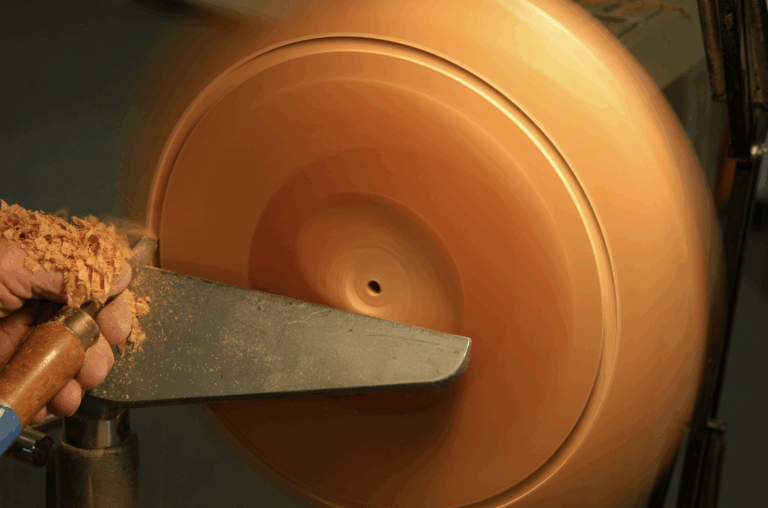
Racing motorcycles – the art of engineering
Chris Gordon has been devoted to the internal combustion engine since his earliest days, when his next-door neighbour was a motor mechanic.
At 14, he was a crew member for Ron Collett, who successfully ran a Top Eliminator class dragster at strips throughout New Zealand. His Chris Gordon Racing Team won the 1998/99 125cc New Zealand Road Racing Championship, with well-known rider Dennis Charlett riding a Honda RS125 that Chris owned and prepared. Chris and his team ran the bike in the 125cc class at the Australian MotoGP at Phillip Island in 1999.
Chris has also, from a very early age, made things: models, an electric bicycle, an electric go-kart; a fibre-glass, road-registered, scratch-built car; and a 500cc V8- powered grand prix racing bike. He has a minimalist approach to tools and equipment, but to make the racer’s V8 engine, he had to buy and master a small lathe and a serious, large and highly capable milling machine. The alternative would have been to get the machining and development done professionally. Chris calculates that this would have involved thousands of hours of very expensive machine time – say, 3000-plus hours at $100 per hour. That’s a lot of money.

Choppers with pedal power
Geraldine High School technology teacher Alan Minnear built pedal-powered choppers with his Year 11 students because he wanted something to capture their interest. He says he initially got the idea for the choppers from another local teacher but then discovered the Atomic Zombie website (www. atomiczombie.com) which opened his eyes to possibilities with the clear instructions available. He paid for and downloaded the PDF files for the two choppers named Vigilante and Overkill that caught his eye.
Because of their relative inexperience, the students basically followed the book for the choppers they built. However, the book gave no measurements, wanting builders to create their own design from the basics.
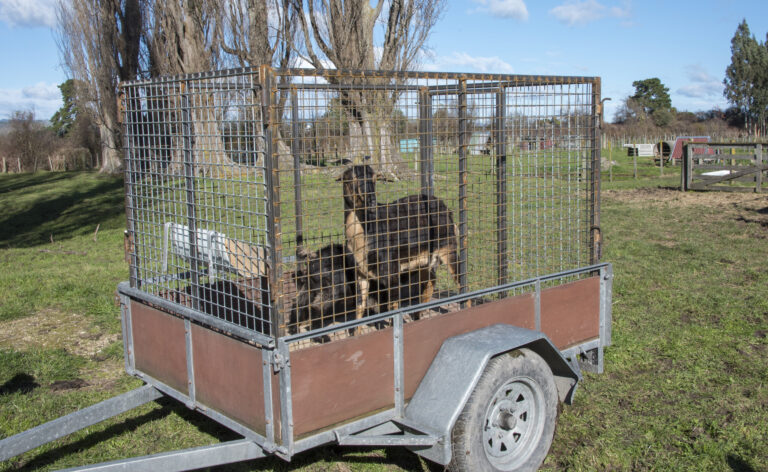
On the move
Farm life, even on a pocket-handkerchief farm like mine, means that you will need to move stock from time to time. I run a few cattle beasts and a few goats. I plan to get a few sheep soon, too. The issue with stock is moving them. Moving the cattle is a different story but for the smaller stock I could carry them either on the tray of my ute or my trailer if either had a stock cage.
I decided that building a cage could be an easily achievable project and so it has proved. It has value even if you don’t have stock – it certainly increases the options for your trailer. It is a lot easier collecting firewood with a cage, even transporting rubbish, or green waste. In the case of the latter you might want to make the end hinged rather than incorporate a gate to make it easier to unload the waste.
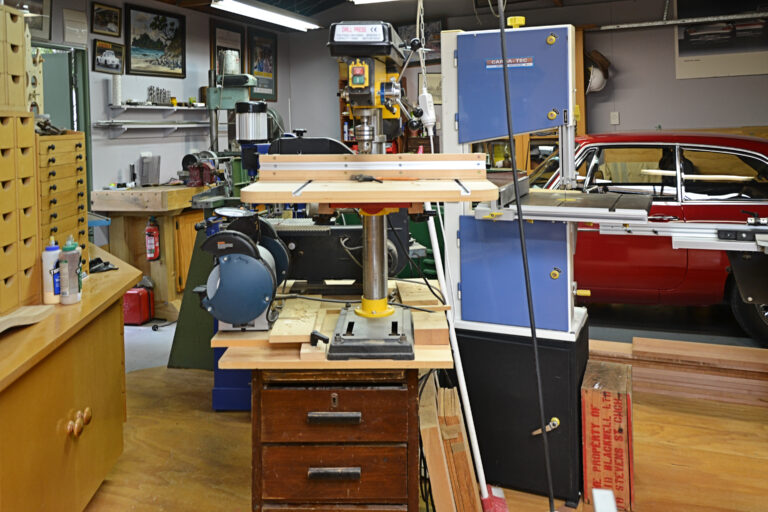
My shed the barn
Capacity is always the issue. My two sheds at home were each at their limit. I had woodwork in one and a one-off car suffering fabrication right on top of it in another.
When it came time to plan a new house on the new section, I thought of a barn-sized shed. In this barn, I would build all the joinery for the house. But first I had to build the barn.
I had a design that had been kicked around for ages and required a giant leap forward in capacity. This barn as my workshop would have good height, tall openings, a range of areas for different tasks and that all-important swing room around the main machine, a multi-function dimension saw.
Like other glimpses I enjoy of by-gone eras, I have always loved those English “oak barns” typically housing Aston Martins in magazines portraying classic cars. The vision I had for my barn was of posts and beams and the roof crouching over long flanks, suggesting back rooms filled with the rare and the useful.
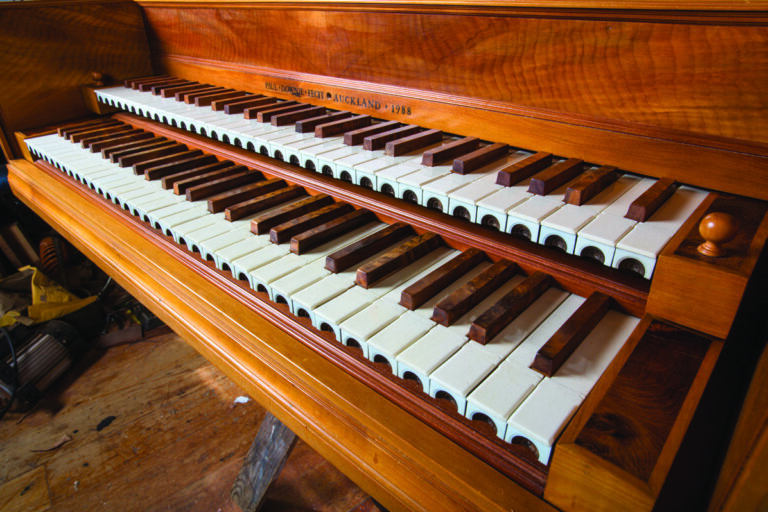
A life in harmony
There is such a thing as serendipity. When Paul Downie was 11 years old a chance meeting at his grandmother’s house was to eventually set him on a course that would define his career.
“I was learning the piano at the time and her friend had a harpsichord that he invited me over to see. I thought it was marvellous,” he recalls. “He told me I should build one and although it sounded like a ridiculous idea, it never went away.”
When he was 22, Paul embarked on the project, researching how to build a harpsichord, scouring junk shops for old tools, sawing bits of wood, and gluing them up until he had constructed the instrument.
“I enjoyed the whole process so much that when I was 23 I decided to build another one. I discovered that overseas museums had very detailed technical drawings of old instruments which you could buy – when they are restored everything about the instrument and the mechanisms are recorded.
“I went on to build two more harpsichords. The first one did work but it wasn’t up to the same standard so I ended up pulling it apart and my sister burnt it as fire wood,” he says laughing. “The others have survived and are owned by very good musicians.”
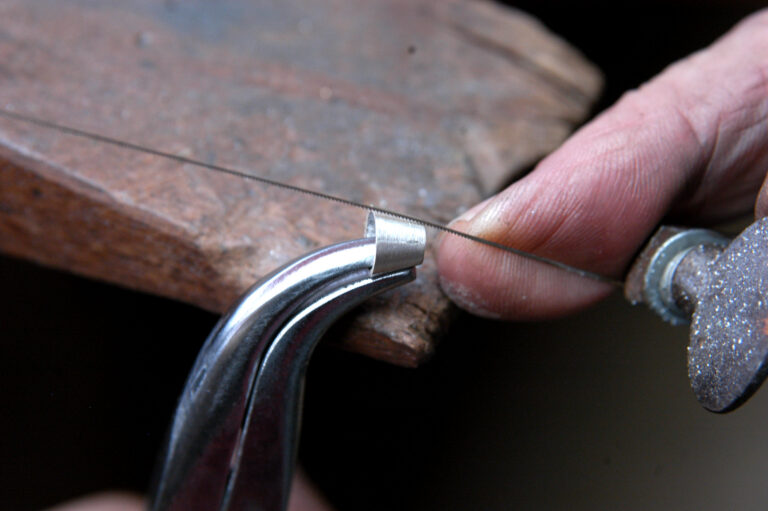
Create your own parrot-beaked pliers
A specialist tool we made in that Hatton Garden workshop where I served my time was parrot-beaked pliers. These are used by the ring-maker for hand-made gem settings. They present the setting in a ring at just the right angle so the jeweller can pierce and file the design of the setting.
The best pliers for this are a pair of heavy, flat-pointed pliers, known in the trade as snipe pliers. Good jeweller’s pliers can cost up to $50, so I save my students money by most often using second-hand electrician’s snipe pliers. You can pick these up at any market for used tools and they do just as well. I am still using the pair I made during my apprenticeship 50 years ago.

The Shed magazine February/March 2026 issue 125 on sale now
Going solar
Solar power seems like a great idea; who doesn’t want free power, right? But, what to choose, and what are the pitfalls of solar?
Regular The Shed writer, Andrew Broxholme, has just completed a large solar installation on his property and shares all the good, the bad, and the ugly aspects of his solar power journey.
I’m environmentally aware, but am not an environmentalist, so I’ve gone solar for only one reason, because it makes good financial sense to do so, that said it isn’t necessarily going to be right for everyone and its impact on your power bills will depend on where you are in New Zealand and the orientation and design of your house relative to where the sun rises and sets.
I’ve been interested in renewables for many years. I first looked at it while living in the UK. The early systems had promise, but really didn’t make financial sense as the cost of installation and ongoing maintenance wasn’t offset by big enough reductions in power bills. They wouldn’t repay that investment during their service life, which at the time was 15–20 years (maximum).
That’s no longer true, with higher volume, the equipment has got a lot cheaper, it is more efficient, but we have also seen huge increases in energy costs; this, in particular, changes the economics dramatically. That doesn’t, however, mean that you can buy the first solar system presented or recommended to you. Read on to find out why.
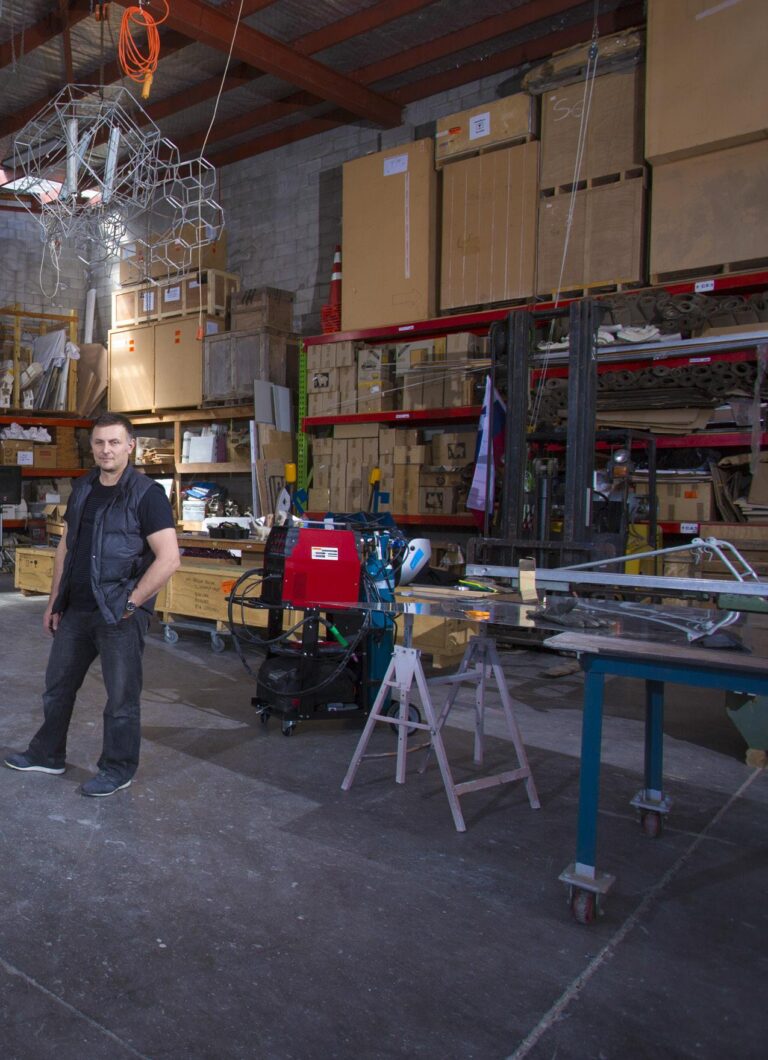
The ultimate man cave
It’s tempting to think of Gregor Kregar’s work space as the ultimate humongous man cave. The 410-square-metre studio in a gritty industrial area of Auckland’s New Lynn certainly has all the “boy’s toys” to make the most avid sheddie happy.
Vises, grinders, table saw and cut-off saw? Check. MIG and TIG welders and drill press? Check. Two electric and a gas-fired kiln? Check. You get the picture. This is a serious space set up to work on all manner of materials.
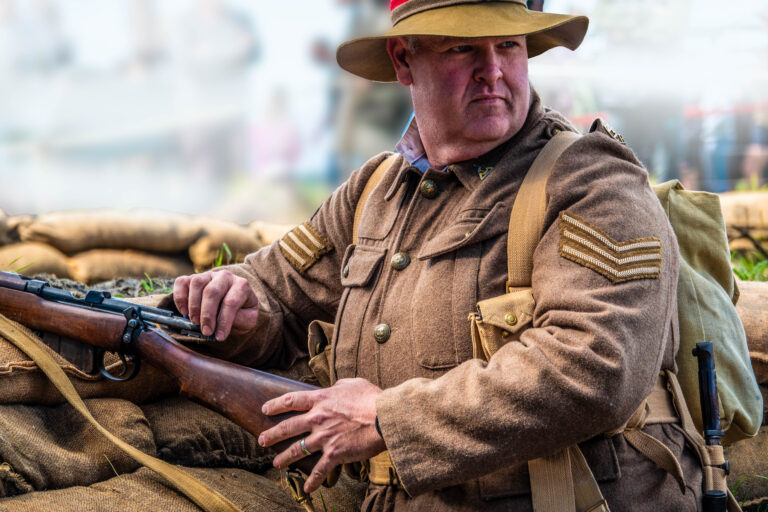
Video of Geraldine Military Museum military revival
Two years ago, Don Pelvin set up the Military Museum in Geraldine as a retirement project.
He is pretty happy with how things are going, with an average of a thousand visitors a month, especially as his museum is one of six in the small South Canterbury town. He also organises the Rangitata Island Military Revival on the Saturday and Sunday of Labour weekend every year.
This is a combination of a display of military vehicles and gear, and reenactments of actions from WWI and WWII, and it all takes place at the Rangitata aerodrome, an airfield owned by a local farmer. About 50 reenactors turned up in their historically correct uniforms with their suitable weapons, after word had spread in the tight-knit military history world that the event was happening.

Introducing the New Linbide.co.nz
Linbide is proud to announce the launch of its newly redesigned website, linbide.co.nz, marking an exciting step forward in how we connect with the woodworking, engineering, and tooling communities across New Zealand.
For decades, Linbide has been dedicated to producing high-quality carbide cutting tools built for accuracy, durability, and performance. Our new website carries that same commitment into the digital space—designed to be faster, clearer, and more intuitive, giving customers a better way to explore our products and understand the value behind the Linbide name.
Woodwork: getting started (2)
A home workshop is a special place and will function much better if you are able to plan how it is set out. My first workshop was in a single garage which was also the home of a very old Austin 7. As I bought machines, things became a little tricky. It was not that motivating on a winter’s evening, knowing I had to shift the Austin and re-arrange the workshop before I started. Our architect’s major renovation to our home included the redevelopment of my workshop area and from a single garage to a 9 m x 6 m workshop was a massive leap forward, even if it is shared with an MG.

The Shed magazine December/January 2026 issue 124 on sale now
The Stude-Maker
Studebaker marketed their groundbreaking 1950 Aero-Nose models as “luxury for everyman.” A young Trevor Halstead thought this was a bit of him, so he began purchasing Studebakers in the early 1970s. The fact that the Champion model he chose was $50 less than the Ford he really wanted did play a small role in that life-changing decision. As they say, the rest is history.
“To the man on the street, they became known as bullet noses, and while they proved to be Studebaker’s best-selling model in 1950, those aero-lines did not age so well, and by 1952, the company reverted to a more conventional front end.
Fast forward a couple of decades into another hemisphere, and a one-man Studebaker ‘Next Look’ revival was about to begin, in the workshop of Studebaker devotee and custom-builder, Trev Halstead. This time, though, those vintage lines would take on wild and offbeat shapes.
Woodwork: getting started – part one
Not be too many weeks pass before someone asks me how to get started in woodworking as a hobby. I have had a life-long interest in making or building things but only in the last 20-plus years has my woodworking become dominant. Most people contemplating something in the woodworking area say they have had previous exposure to the craft, but often that was just a brief introduction during their school days.
Perhaps the biggest decision is first to determine that you want to start making something out of wood. Once under way, you will probably move in a particular direction that interests you.
One of the best places to start is at a woodworking hobby class at a local school or polytechnic.

Hammering history
You can probably count on the fingers of one hand the number of Kiwi women who have become blacksmiths in their 60s. Judy Waterston of Livingstone, inland North Otago, is one of them.
As a child Judy spent hours in her engineer-father’s workshop sorting nuts and bolts, tidying away his tools, sweeping up, and watching him make things. She says her love of tools and machinery came from her dad.
The blacksmithing seed was sown in 1972 when Judy first saw Nicol’s Blacksmith Shop in Duntroon, some 40 km from Oamaru up State Highway 83. The building was being devoured by periwinkle planted 100 years before to act as a fire retardant. Most of the windows were smashed and it was draped in cobwebs.
“I looked through the broken windows and when I saw the anvil and bellows they took my breath away,” she remembers. “I’ve loved this building ever since.”
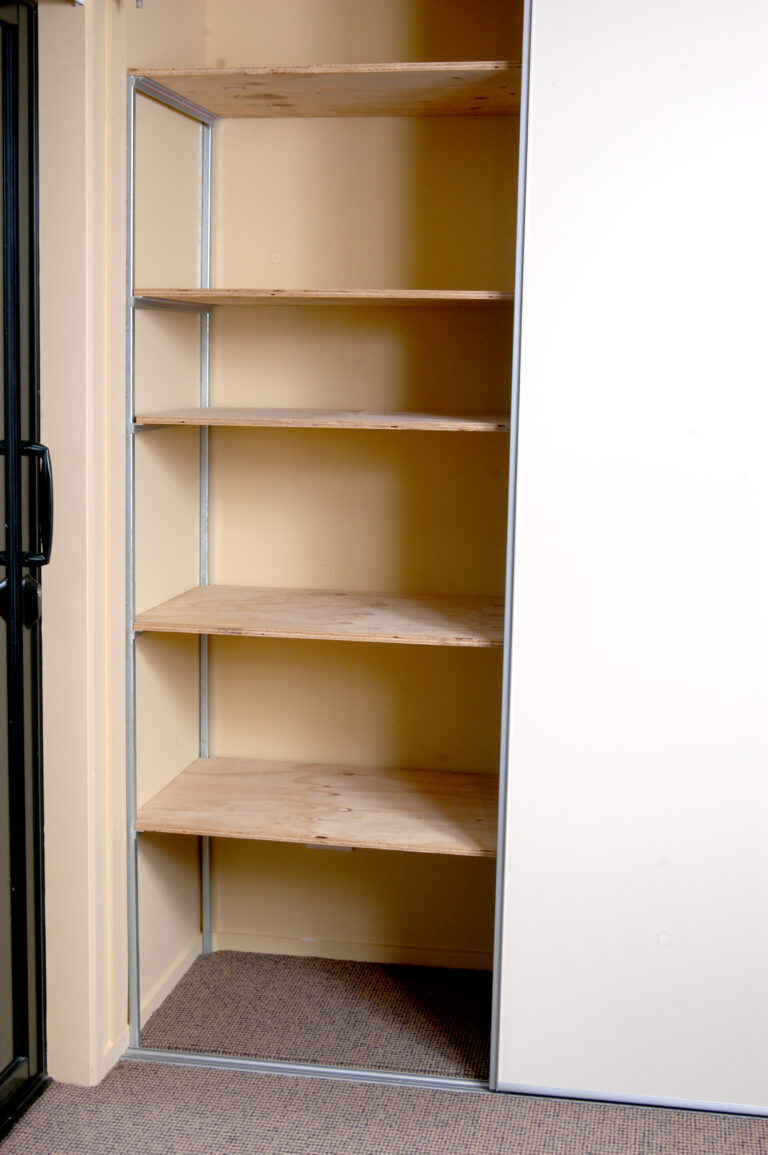
Metal and wood shelving
No matter how much storage space you have, there is always a need for more. One solution is to make better use of existing cupboards and wardrobes. In my own house the third bedroom is used as an office, so the built-in wardrobe was an obvious target for conversion into a storage place for files and computer supplies.
I had already tackled one shelving upgrade. We have a hallway cupboard used for many things that don’t have a place anywhere else, including toys for the grandchildren when they visit. The space was not used well. My solution was homemade shelving using frames of steel with plywood shelves.
For this cupboard, we had to allow for a basket of toys and chillibin on the floor level and picnic items and other bits and pieces on other levels. Once the shelves were installed, better use of space meant more room became available. One of Murphy’s Laws soon came into play and other items found their way into the open spaces, making good use of the variety of shelving.
A Legend Returns
A Legend Returns
A Historic Ferrari Monza 750 Joins the 2026 Ayrburn Classic Line-Up – 20-22 February 2026
The Ayrburn Classic, one of the most anticipated motoring events on the New Zealand calendar, is set to take things up a gear in 2026 with a line-up that promises to captivate enthusiasts and the general public alike. Following the success of the inaugural event, the Ayrburn Classic returns with a recently confirmed feature that is nothing short of extraordinary: the historic Ferrari Monza 750 – a masterpiece of motorsport and one of the most significant vehicles to race on New Zealand soil.
Legendary status
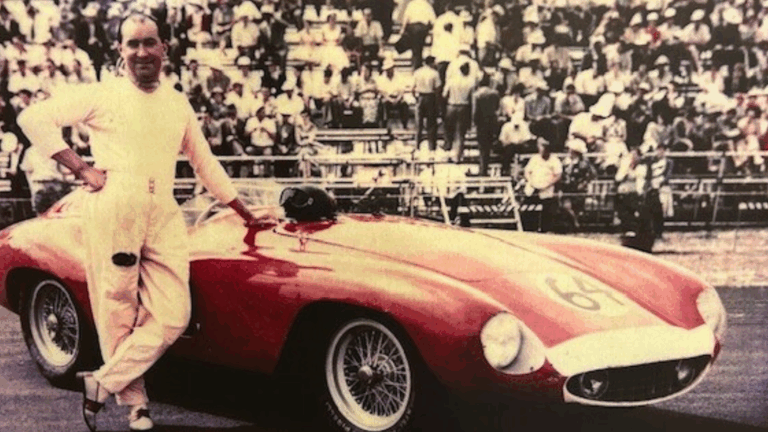
This particular Ferrari Monza 750, which arrived in New Zealand in 1957 and has remained here ever since, holds a legendary status in motorsport history. It competed in the Mille Miglia, Le Mans, and the Targa Florio – the ‘Big Three’ of European endurance racing during the golden era of the sport. Few cars can claim such provenance, and even fewer have such a deep and poignant connection to New Zealand’s own racing legacy.
Tragically, the Ferrari Monza 750 was involved in a fatal accident at Ardmore in 1957, marking the final moments of British driver Ken Wharton, whose last photograph was taken next to this very car. The vehicle has since been meticulously preserved, with images from the aftermath of the crash etched in motorsport history. Today, it stands as a symbol of both the bravery of that era and the enduring beauty of Italian automotive craftsmanship.
Recreating history
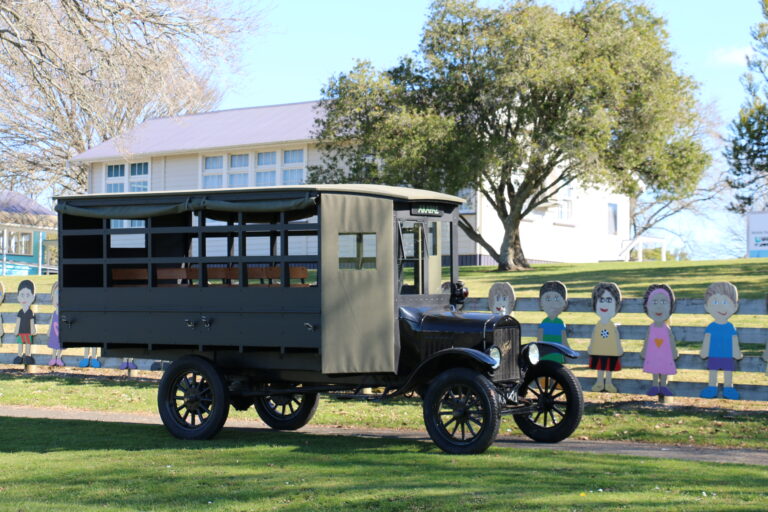
It seems the Phoenix Bus Company was well named, as like the phoenix bird of legend, the new bus has been reborn from the ashes of the old, so to speak.
A former principal of Piopio College, a local boat builder, and the whole community rallied around to recreate the Model T Ford bus, identical to its forebears.
It began when Brian Tegg, an ex-principal of Piopio College, found a 1921 Model T Ford restored transport truck for sale in Auckland and brought it on impulse three years ago.
Realising it was a unique opportunity to transform it into a bus, he got the Piopio College Trust and the local community behind the project.
Local fundraising by the Piopio College Trust, a Givealittle crowdfunding campaign, and support from many local people and businesses made the project happen.
Piopio is a small town of just 400 people but they have pride in their history.
Local boat builder Max Laver became involved in the project, transforming the truck into an exact copy of the early buses.
From Rust to Rrroarrr video part six
Restoring a 1952 AJS Part 6 – electricals (breadboard testing), suspension, controls, petrol and oil
I’m continuing the rebuild of an old (“1952”) AJS 500cc motorbike.
This is the second rebuild it has had; the first was by someone else. I have ownership papers which indicate a rebuild in the late 1960s, and it seems to have been a very broad collecting effort, pulling in different parts from different machines.
The web makes it easier to identify the bike’s parts, and mine date from 1947 to at least 1956: I feel that I’m not constrained by concerns over authenticity. I can change parts if I want to: personalise the machine a little.
Readers of my first article will know that I used part of a barbecue hotplate to fix a broken cooling fin on the motor, using nickel electrodes. I have been electroplating using nickel as a replacement for decorative chromium. I can hear The Who singing “Substitute”.
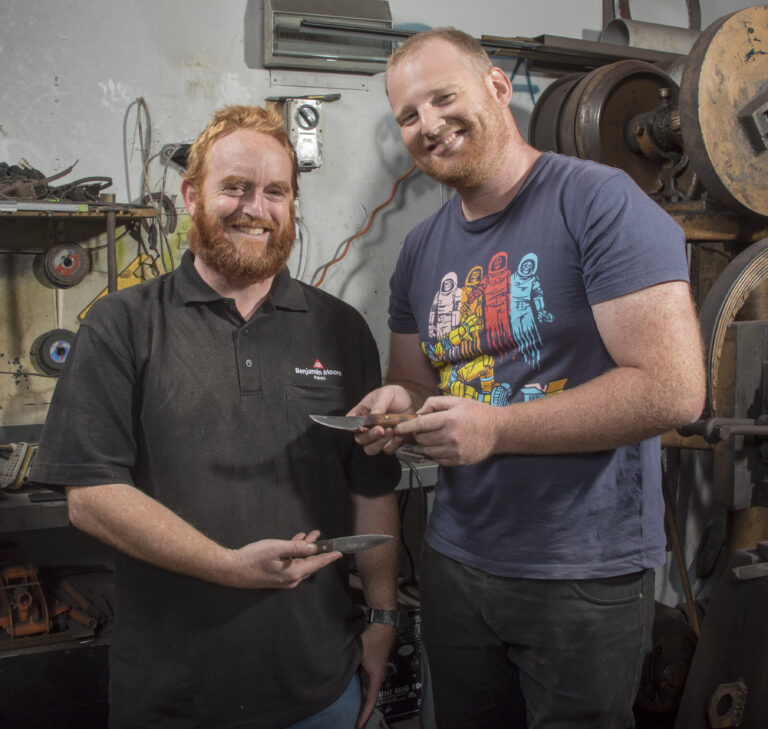
Forging ahead – take a knifemaking class
Knifemaking has undergone a resurgence in the past few years. It may be the fact that it requires only a modicum of equipment. You only really need a file and gas torch.
Of course the more elaborate the knives you make, the more gear you will need but this is one of those hobbies that can grow with you. Naturally, having a forge, some sort of anvil – even if it is only a lump of hard steel or a bit of railway line, a grinder, and a hammer will extend your options and none of these are particularly expensive. There are a number of knifemaking classes springing up all over the country to cater to this interest. Shea Stackhouse runs classes in basic knifemaking, making Damascus steel and blacksmithing
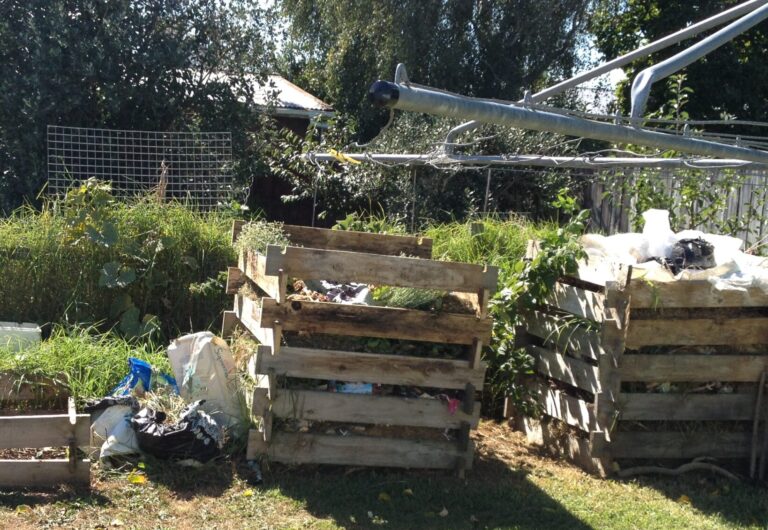
Simple bins
Many black plastic bins from the hardware shops don’t allow enough air through or are only big enough for postage stamp-sized sections or blocks of land.
I make my own compost bins. Now that might seem fairly easy, but how many compost systems either take a huge amount of effort, or produce something reminiscent of milking-shed sludge? These bins require very little intervention besides putting stuff in.

The Shed magazine October/November 2025 issue 123 on sale now
Beyond the grain
At age 15, Edward Prince declared to his Dad, “I’m going to be a cabinet maker”. Nowadays, Edward the furniture maker is pushing timber’s boundaries through innovative projects like bodging chairs, carving bowls, crafting bows, and designing bass guitars.
A forest of lithe, towering ricker Kauri, adolescent Rimu and tall ferns shade the glade around Edward’s workshop. Leaf mulch, bark chips and forage strips camouflage the paths. Twisted logs rest against a small retaining wall awaiting a fresh designation, and a cluster of rustic timber chairs encircle a brazier on the lawn above. From the tree tops, invisible Tui chime and call while through a set of dusty French doors, an apparition of Edward can be seen and heard, cutting, carving and creating.
Edward remembers when he first set eyes on this place; it reminded him of an image on a postcard that he had saved in England. He recalls, “It was a picture of a small church in a hollow, surrounded by trees. It struck me as a place of peace and tranquillity. I thought how nice it would be to live in such a sanctuary. This place is what I had in my mind.”
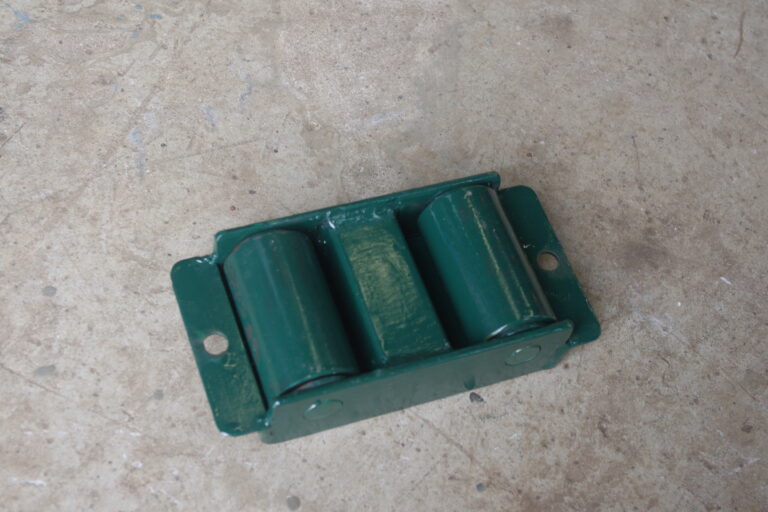
On the move
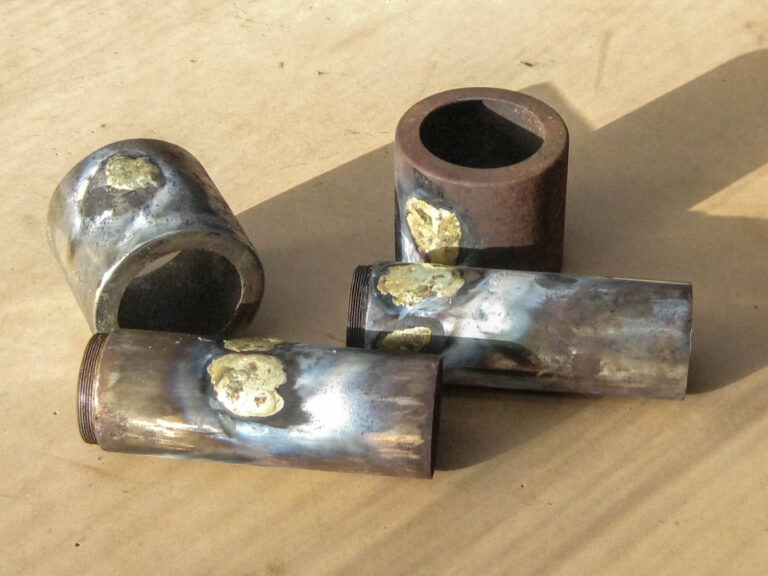
Moving machinery and heavy items around the workshop is a common job for most sheddies, especially those with an addiction to Victorian-era cast iron.
While using a bar or pipe for rollers works, as shown by the builders of the Egyptian pyramids, they won’t work if you have feet or obstructions, and are difficult if you are working by yourself.
Load skates are small, heavy-duty roller skates that fit under the load and you will generally need a set of four. This load skate is made from 100x50mm steel channel with rollers made from 40mm pipe with ball bearings. The bearings are cheap 6004RS model bearings which are a snug fit into 40mm pipe, and cost $2-3 each from online suppliers.
As this project was built out of materials to hand, I only had tapered flange channel so I used my horizontal milling machine with a side and face cutter to remove the taper.
Getting a grip
I’m currently making a mould for a rotational moulded boat. It’s a complex project with barely a square angle in it and dozens of folds and welds. It’s the sort of job that requires precision and the often needs more than two hands.
Clamps are useful but they are usually fiddly and can have a tendency to slip at the last moment especially where there aren’t any flat even surfaces to get a purchase on. So I wasn’t expecting too much when I was asked to try the Strong Hand utility clamps.
They are lighter than cast clamps so I had some doubts that they would have the clamping strength I needed for the more difficult pieces.
I was a bit dubious about the sliding action, too. It’s unusual to use sliding F-clamps in engineering but I’ve seen them used in boat-building and woodworking.

Be in to win this Father’s Day with The Shed
There’s going to be one lucky dad this Father’s Day
Be in to win a Husqvarna Pressure Washer worth RRP $729 when you subscribe to The Shed magazine.
Subscriptions start at only $39! Head here to our own shop magstore.nz to subscribe
Enter the code ‘WASHER’ at checkout to enter the draw.
Ts & Cs: Entries close 30 September 2025. This offer is open to New Zealand subscriptions only. The winner will be notified by email and have their name published in The Shed magazine.