Making a kayak anchor

This simple and effective rebar anchor is perfect for small boats and kayaks and is the result of welding $30-40 worth of materials. If you are a small boat and kayak enthusiast, fabricator or just want to learn some new metalwork skills, this two-hour project will be great for you; it needs few welding skills. Remember that the construction is modular and can be made to fit your needs. With a net weight of only 7 kg, the anchor will not weigh down a boat or kayak. Anyone can pull it up, but it will still catch the seabed.

Keeping it simple
By Stu Bryan
Photographs: Stu Bryan

Stu Bryan and his rebar anchor

Stu Bryan got in touch with an idea about keys he had fabricated and then went on to suggest a small anchor he was making for his kayak. The young welder from Northland politely enquired whether there was an age limit to write for The Shed magazine, as he was only 16. No problem. Here’s his project:

This simple and effective rebar anchor is perfect for small boats and kayaks and is the result of welding $30-40 worth of materials. If you are a small boat and kayak enthusiast, fabricator or just want to learn some new metalwork skills, this two-hour project will be great for you; it needs few welding skills. Remember that the construction is modular and can be made to fit your needs.
With a net weight of only 7 kg, the anchor will not weigh down a boat or kayak. Anyone can pull it up, but it will still catch the seabed.

CAUTION: This project includes grinding and welding. Exercise care by using the appropriate safety equipment: safety glasses, gloves, a welding mask, enclosed shoes and hearing protection. Depending on what paint you use, you may need to wear a mask. If you are under 16, adult supervision is necessary.
My experience with welding ranges to about a year of arc, MIG and oxy-acetylene welding. For this project I used an arc welder as these welds will not corrode as fast as some MIG wires. An arc welder creates a stronger bond which will be more desirable for the anchor.
I used the following materials but you can change these sizes to fit your needs.

Measure 300 mm length of rebar

Materials
900 mm of 10 mm thick rebar steel
350 mm of 30 mm inner diameter steel pipe
Large shackle
“Extra thin” grinding wheel
2.3 mm arc welding rods
Thick enamel waterproof paint or CRC zinc spray
Rope
80 grit sandpaper
Most of the materials can be purchased at big barn retailers but the steel pipe will be harder to find. I sourced mine from an engineering shop but it was still rather cheap.

Use safety glasses when using a grinder

Cutting
Your steel supplier might be gracious enough to cut your steel pipe and rebar which needs to be divided into three 300 mm lengths. Otherwise you will need to mark it (scriber or marker) and cut it yourself—I used the “extra thin” grinding wheel but you could use a bandsaw. When you cut the rebar and the steel pipe (to 350mm long), remember to wear your safety glasses.
I used 80 grit sandpaper and a wire brush to sand down the surfaces sharp edges of the rebar and pipe or you could use a power sander or even angle grinder with sanding attachment. This stops as much rust as possible and give a stronger weld.

Steel pipe gives leverage for bending rebar
Two bends at 90 degrees and 45 degrees

Bending
Pull out those guns and using your forefinger and thumb, bend the rebar to your chosen angle. Joking aside, you will need a strong steel vice to hold the rebar when you bend it. To get a grip on the rebar and to help with the leverage, I slipped a steel pipe over the rebar.
To create basic shape of my anchor’s hooks, first 150 mm up the rod I bent the rebar at 90 degrees. I then placed the rebar in the vice with the bend pointing towards me, slipped the cheater bar over the shorter side and bent this to a 45 degree angle. After replicating this three times, I was ready for welding.

Snug fit

Welding
I used an arc welder that ranges from 80-150 amps and 2.3 mm welding rods. This is more than enough amperage to kill me, so caution is needed when operating an arc welder or any welder for that matter.
The three bent rebar rods fitted well enough in the steel pipe so that no clamps were needed. First I lay some slug welds over where the rebar sat side by side in the pipe then put more welds where the rebar touched the steel pipe. This thing needs to be solid. To test the strength of the pipe drop the anchor onto solid concrete. If the welds crack or snap off then you need to re-weld.
To weld the shackle on, I had to hold it with one hand (gloves!) to place a tack weld so I could lay slug welds to strengthen the connection. This is where the rope attaches to the anchor so weld the U-shaped steel fitting to the pipe, NOT to the bolt that come with the shackle.
Make sure to place a big strong weld between the pipe and shackle as this is going to take a lot of force when you dislodge the anchor to pull it up. Use the drop test again to check the strength of the weld.

Slug welds
Stu used an arc welder

Painting
Chip the flux off the welded areas using a flux hammer or old screwdriver before you paint it. I gave the anchor another sand down and hit the rust with a wire brush before using waterproof emulsion (or enamel paint) to brush several coats onto every surface on the anchor. You can also use an aerosol zinc spray—put on many coats of this but paint in a well-ventilated area. To ensure a longer and stronger use of this anchor, I will remove the old coat and repaint it once a year.
To use the anchor, I  tie a loop in rope, pass the shackle bolt through it and screw the bolt into the shackle. You now have an anchor perfect for small boats and kayaks that did not cost as much as a commercial anchor. It’s a perfect gift for boaters or personal use. Have fun on the water and building.

Shackle welded onto pipe

Share:

More Posts

Westland Industrial Heritage Park: From trash to treasure

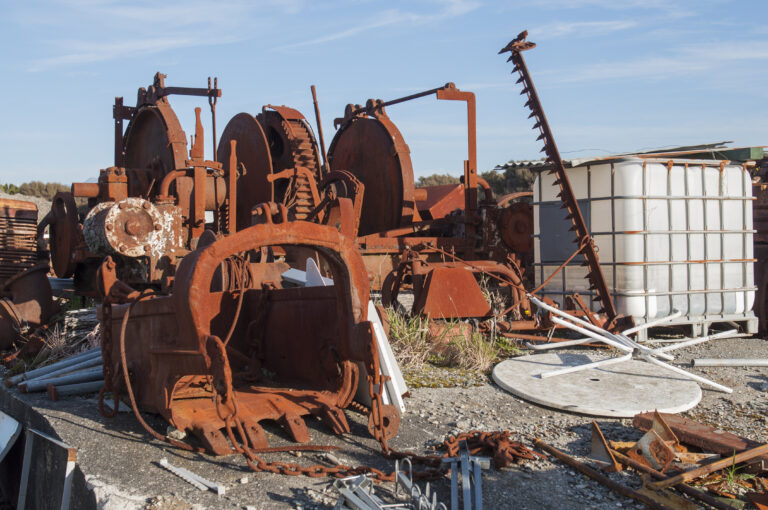
The West Coast has a history as rich as it is rugged, with a past steeped in mining, logging, and dairy farming on a forest-clad strip between the mountains and the sea. Up by Hokitika airport is a sheddies’ paradise where relics from this past are being resurrected by an enthusiastic and capable band of volunteers.
“It all started back in 1981. Everything was going by train out to scrap, so we formed a club to stop it,” says Mort Cruickshank. The “we” were four young men – Spike Jones, Jim Straton, Mike Rooney and Mort. They formed the Westland Farm and Vintage Machinery Club and started salvaging old machinery that had been destined for the dump. With no premises, they kept it in their backyard sheds and met sporadically to plan the future.
Four decades on, and the Westland Industrial Heritage Park, spread over several acres up by Hokitika airport, is packed with machinery, sheds and enthusiasts. It is a hub of community activities, has a Menzshed on site and is increasingly a drawcard for tourists.

Making a gate – the blacksmith way

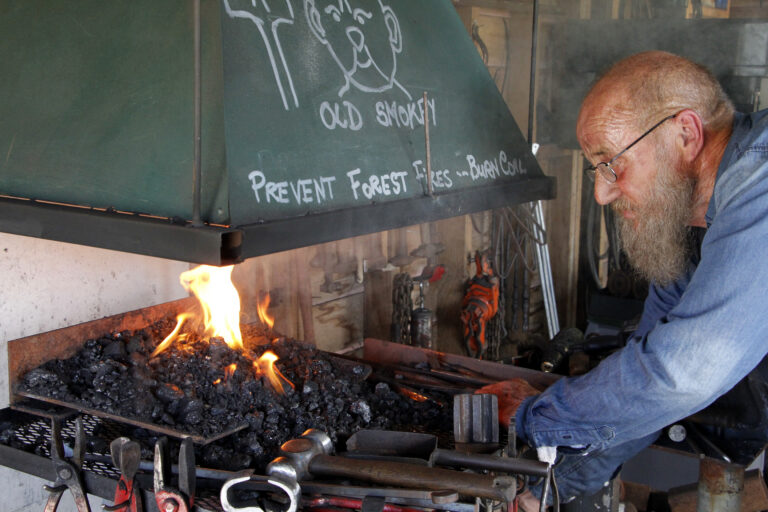
Joe Parkes is a blacksmith and as a youngster learned his trade the hard way. In 1958, aged 12, he was apprenticed to his grandfather and he quickly learned not to make mistakes. His giant Scots grandfather, Jack James, was a smithy of the old school. If young Joe got something wrong he had his head dunked in the half barrel of water used for cooling steel from the forge. He learned quickly.
“My grandfather, I called him Pop, was a big bugger, standing 6 ft 11 inches (1.8 metres) tall and weighing in at 20 stone (127 kg). He was a hard bastard, but he was my mentor. I once saw him pull a man through a high hedge and throw him over the top. You didn’t mess with him. If the blacksmiths got into a scrap you kept well clear.

Hot stuff in Taranaki

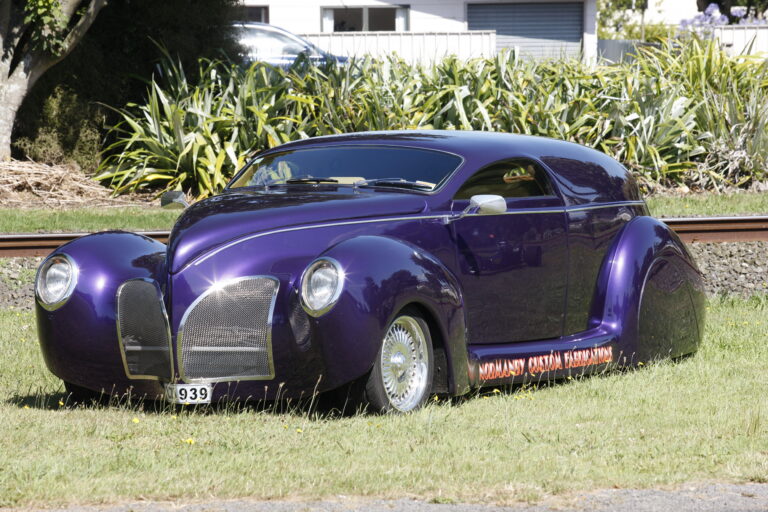
Hot rods – we see them rumbling round the highways and byways, big V8s burbling, immaculate finished body and paintwork and obviously someone’s pride and joy. Many people don’t realise the work that goes into customising one of these gleaming machines. Some are old cars reshaped and rebuilt, and some are made from scratch, often using the classic designs and lines of cars built in the 1920s, 30s and 40s.
In the little town of Normanby in South Taranaki there’s a workshop set up to create these beasts. We caught up with guys from three businesses in a row having smoko together. An upholstery business, a custom fabrication shop and an engineering shop. All mates who work in together in a way that can only happen in a small town.