Mark accurate curves on MDF, ply, ramps, sheetmetal
By Bob Hulme
Trammel ends for pencil and for centring end marker
A trammel is a really useful item to have when you need to mark a curve onto sheet metal, plywood, MDF, plasterboard, or even a paved surface when painting lines for a netball court.
Sure, you can use a pencil and a piece of string but there can be a variation due to the angle that the pencil is held and differing tensions on the string. A trammel will easily produce an accurate arc.
The fashion of Spanish-styled portals in homes has long gone but there are plenty other examples where a trammel is needed such as skateboard ramps, garden edging, or sculptural work.
Essentially a trammel is a long rod with ends that can be adjusted along it. One end holds the pointer for locating in the centre of the arc, the other holds the marker for tracing the arc. This can be a pencil, chalk, felt tip, or a scriber point depending on your need.
Trammel marks arc
Trammel in action
Bar and ends
For this project, I have made the trammel ends from 1 ¼” (31.8 mm) diameter aluminum round bar because it is lightweight, easy to machine, and because I had some offcuts lying about.
For the trammel bar I have used ¾” (20 mm) galvanised pipe. You could use wooden dowel, tubing, or a solid metal rod, but galvanised pipe is probably the cheapest.
For ease of use, you can cut a full length of pipe into pieces that will give you a choice depending on how big an arc you need to draw.
Firstly I made a drawing of the trammel ends so that I could see physically how the size of material I wanted to use would work with the galvanised pipe. Having a drawing to work to makes the job easier, particularly, if like me, you get interruptions. They mean a straightforward job like this that should take a couple of hours to do ends up being spread over a couple of weeks.
With a drawing to refer to, I have all my thoughts recorded and don’t have to work out things again each time I get back to the project. The next step is to plan the sequence of the job. This project is not complicated, but the discipline of fi first drawing then sketching what is required then planning the sequence of operations to make it is essential for the success of any project.
With lathe work, it is possible to get the sequence wrong and find that there is still some machining to do, but no convenient part of the job left to hold in the chuck. For these trammel ends, I have decided first to cut them from the bar approximately to length, then drill the cross-hole that the pipe will slip through.
The reasoning here is that I can then drill from each end in the lathe and the drill will break through into the large cross-hole. If I had drilled the smaller holes first, I would have had trouble drilling the cross-hole while cutting past the smaller holes, catching the edges of the drill. The drill would grab and possibly jam. The sequence for making the trammel ends looks like this:
1. Cut pieces approximately to length. Leave extra material to allow for facing the ends in the lathe and to take into account how square your cut will likely be.
2. Mark the position of the 21.5 mm diameter cross-holes and drill.
3. Face and chamfer the ends in the lathe and drill the 8 mm diameter hole for the pencil and the 6.8 mm diameter hole (tapping size for M8) for the metal pointer in the other end.
4. Cross-drill the 6.8 mm diameter hole for the tapped hole for the pencil-clamping screw. Tap the thread in the screw holes in the clamp.
Cross-drilling
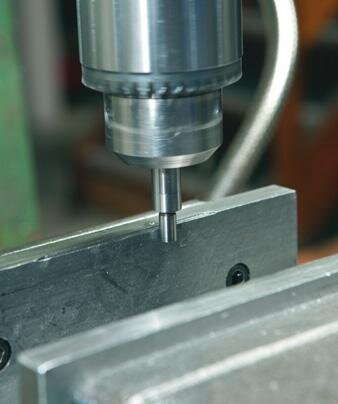
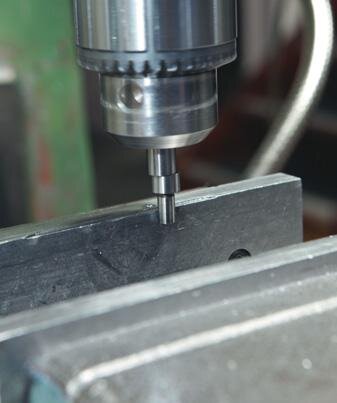
The trick with cross-drilling is to start the drill directly over the centre of the round piece of material.
If you have a milling machine or a mill drill machine this is not too difficult. With the machine-vice clamped to the table and its jaw clocked parallel to the slideways, use an edge-finder tool to accurately locate the fixed vice jaw.
Measure the diameter of the work-piece, then wind the table across half that diameter so that the drill chuck is directly above the centre. If you are using a drill press it is a bit more difficult. You have to rely on marked lines on the workpiece. Use a centre-finder from a combination square/ protractor set to scribe a line across the end.
If you don’t have one of these then put the workpiece in the lathe and lightly face the end. An obvious central point will be seen from the circular tool marks. Using a rule and scriber, mark a straight line directly through the point. Now use a square to transfer that line along the side. Set up the workpiece in your drill-press vice so that the line on the end is vertical. Use your square for this.
Drill a small hole first. It will not tend to wander as much as a large drill and its point will be easier to centralise over the marked line on the side of the workpiece. A 5 mm diameter drill should be fine for this. Just use light pressure on the drill and high RPM for the small size. Drill out the hole to 21.5 mm diameter using slow RPM for the large size. Probably the slowest a normal drill press will go is best.
Stepped shanked drills are available for drill presses as the maxi-mum most drill press chucks will hold is 13 mm diameter. Stepped shanked drills allow you to drill larger holes, but be aware that your drill press is only designed to drill up to 13 mm holes. If you are using a stepped shank drill, keep the loading to a minimum. It will be fine when drilling wood or other soft material or when opening out an existing hole, but not suitable for drilling directly into solid steel.
While my drawing calls for a 21.5 mm diameter hole, you could use an imperial size drill close to this, such as 27/32” diameter. Break the sharp edge of the hole with a deburring tool.
Cross-drilling trammel end
Stepped-shank drill
Using square to set up for cross drilling in drill vice
Lathe time
Facing and chamfering the ends in the lathe is straightforward.
I have used a square, tungsten carbide insert tool as it suits both facing and chamfering. To drill the holes, centre-drill first, then drill.
Use a countersinking tool to finish the edge of the hole. Drilling the pencil-clamping hole is the same procedure as for the 21.5 mm diameter cross-hole. While all the machining on aluminium done so far can happily be done dry, the last operation of tapping the clamping screw holes is best done using a cutting oil.
This will ensure there is nice clean cutting, rather than tearing of the thread. For aluminium, there are excellent special cutting oils available such as A9. Alternatives include kerosene or even WD40. To make the point for the centring end of the trammel, use a piece of silver steel 5/16” (7.94 mm) in diameter. This size will fi t easily into the 8 mm drilled hole.
Face and chamfer one end. Turn a point on the other end by setting the compound slide over at an angle of 30 degrees. It is very important to have the cutting tool exactly on spindle centre height for this. Lock the saddle to the machine bed and wind the cuts across using the compound slide hand-wheel.
You don’t need to machine it to a very sharp point, but it should be sharp enough to locate snugly into a centre punched mark or to penetrate into a wooden panel where a centre position is marked. Silver steel is quite tough in its soft state but can be hardened. If you have an oxyacetylene gas set, heat the pointed end to a bright red and quench in water. Then temper back to a dark, straw colour.
Silver steel is available in 300 mm-long pieces from most engineering supply companies. Assemble the trammel ends onto the pipe bar and clamp them using thumbscrews or standard bolts.
Thumbscrews are better because they will only be hand-tightened. If you use cap screws, as here, be sure not to over-tighten them with an Allen key.
Deburring tool breaks sharp edge of hole
Drilling in the lathe
Heat and quench to harden silver steel